Adobe Photoshop isn’t usually the first tool that comes to mind when we talk about video. But surprisingly, it does more than just images. With timeline support and frame-by-frame editing, it can handle video clips fairly well, especially for short animations, GIFs, and minor edits. Exporting your video, though, can be a bit less obvious than you’d expect. But no worries – there are multiple solid ways to get it done.
100% Working Guides to Export Video from Photoshop
Using the Render Video Option
If your timeline is set up and your layers are in order, the most straightforward method is through the built-in Render Video feature. It’s flexible, supports high quality, and gives you several file format options to choose from.
Go to File > Export > Render Video. You'll see a new window with several settings. Here, you can name your video, select where to save it, and, most importantly, choose the format. The usual choice is Adobe Media Encoder with H.264 for MP4 output. You can also use QuickTime if you're looking for MOV files.
You can adjust the document size or pick one of the presets like HD 1080p. Frame rate, alpha channel, and color depth can be customized as well. After setting everything, hit Render, and Photoshop will start exporting the video based on your timeline.
This is the most controlled method, and usually, the first one people try when working with animation layers or video clips within Photoshop.
Exporting as an Image Sequence
Sometimes you don’t want a video file directly. Instead, you want to have every frame as an individual image. Maybe you plan to re-edit it later in a video editor, or maybe it’s part of a workflow for stop-motion or effects-heavy edits.
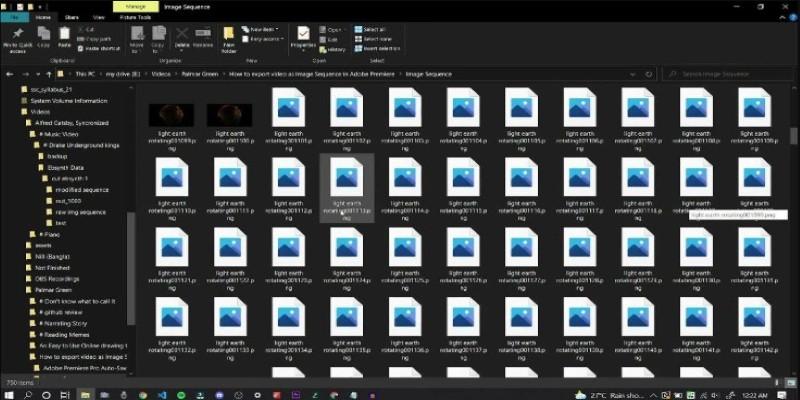
In that case, head to File > Export > Render Video, just like before. But under format, choose Image Sequence instead of a video codec. Photoshop will export each frame as a still image in the format you choose – JPEG, PNG, or TIFF.
Using this method helps you name your output clearly and ensure the frame rate is exactly what you'll use in the post. Otherwise, syncing things later can be a pain.
This is particularly useful if you’re exporting a GIF timeline or a frame animation and want to polish it elsewhere before final rendering.
Using Save for Web (for Animated GIFs)
GIFs are still very much alive, especially for short, looping animations. If your timeline is made up of frame animation (not video layers), then the classic Save for Web method works best.
Go to File > Export > Save for Web (Legacy). Make sure the preset is set to GIF. You’ll have to select looping options – either once, forever, or a custom number. Frame rate is tied to your frame delay, which you can set in the timeline itself.
There’s also the ability to reduce colors and optimize for file size here. This is handy if you're planning to upload your GIFs to places with size restrictions. Once everything looks good in the preview, click Save, and your animation gets exported as a web-ready GIF.
This method doesn’t work well for video layers or high-res exports, but for animated logos, sketches, or quick demos, it’s perfect.
Exporting Video via Adobe Media Encoder (Manual Method)
While the Render Video feature usually uses Adobe Media Encoder in the background, you can also go one step further and handle it manually – especially if Photoshop is giving trouble with certain formats.
First, export your animation or timeline as an image sequence or even a PSD file (with the timeline intact). Then, open Adobe Media Encoder separately. Drag your file in and assign the format (MP4, MOV, etc.), along with bitrate and audio if needed.
This method is slightly more involved, but it can be helpful when Photoshop crashes or refuses to export large video files. It also gives more control over codecs and compression levels.
You might also want to use Media Encoder if you’re planning to use the exported file in Premiere Pro or After Effects right after.
Exporting via Adobe After Effects
Yes, you can take your PSD with video or animation layers and import it into After Effects. This is ideal if your project has complex timing and transitions or needs more effects than Photoshop can handle.
Just save your file normally in PSD format. Then, open After Effects and import the file as a composition. AE will retain all your layer structure, including timing. From there, you can export the video using After Effects' render queue or Adobe Media Encoder.
This method gives flexibility and is often more reliable for longer animations or when you're mixing motion graphics with video layers.
Exporting with Photoshop’s Timeline to Frame Animation Conversion
Suppose you started with video layers in the timeline but want to convert it into a frame-by-frame animation (useful for exporting to GIF). In that case, Photoshop lets you switch timeline types.
Click the menu icon in the top right of the timeline panel and choose Convert to Frame Animation. Photoshop will split your video layer into frames based on the playback. Then, you can adjust the frame delays, remove duplicates, or make other changes.
After that, just use Save for Web (Legacy) as you would for a traditional GIF export.
This method is for those who start with video but later realize they need a looping animation or want more control over individual frames.
Quick Export Using Adobe Bridge (For Image Sequences Only)
If your export involves image sequences, Adobe Bridge can be a quiet helper. You can set up a batch process that converts all your exported frames into a quick video using another tool like Media Encoder or even Photoshop again in batch mode.
Export your frames first using the Image Sequence method, then open them in Bridge. From there, assign a batch command or move them into Media Encoder for final processing.
This is more about convenience. It's not a direct video export from Photoshop but a practical trick when you're working with many clips or need quick assembly.
Conclusion
Photoshop has more export options than people realize when it comes to video. Whether you're working with clips, animations, or layered compositions, there's a working method to get it out cleanly. From direct rendering to using other Adobe tools for backup, you're covered on all sides. Choose what fits your workflow and your project's needs – and you’ll never be stuck at the export stage again.